Quickstart
You can go through the written quickstart here or watch the video on YouTube:
Before you start, make sure that you have the following resources created in Azure and have their names ready to input to the plugin:
Azure Subscription ID
Azure Resource Group
Azure ML workspace
Azure ML Compute Cluster
Azure Storage Account and Storage Container
Azure Storage Key (will be used to execute the pipeline)
Azure Container Registry
Make sure that you’re logged into Azure (
az login).Prepare new virtual environment with Python >=3.8. Install the packages
pip install "kedro>=0.18.2,<0.19" "kedro-docker" "kedro-azureml"
Create new project (e.g. from starter)
kedro new --starter=spaceflights

Project Name
============
Please enter a human readable name for your new project.
Spaces, hyphens, and underscores are allowed.
 [Spaceflights]: kedro_azureml_demo

The project name 'kedro_azureml_demo' has been applied to:
- The project title in /Users/marcin/Dev/tmp/kedro-azureml-demo/README.md
- The folder created for your project in /Users/marcin/Dev/tmp/kedro-azureml-demo
- The project's python package in /Users/marcin/Dev/tmp/kedro-azureml-demo/src/kedro_azureml_demo
Go to the project’s directory:
cd kedro-azureml-demoAdd
kedro-azuremltosrc/requirements.txt(optional) Remove
kedro-telemetryfromsrc/requirements.txtor set appropriate settings (https://github.com/kedro-org/kedro-plugins/tree/main/kedro-telemetry).Install the requirements
pip install -r src/requirements.txtInitialize Kedro Azure ML plugin, it requires the Azure resource names as stated above. Experiment name can be anything you like (as long as it’s allowed by Azure ML). The environment name is the name of the Azure ML Environment to be created in the next steps. You can use the syntax
<environment_name>@latestfor the latest version or<environment-name>:<version>for a specific version.
#Usage: kedro azureml init [OPTIONS] SUBSCRIPTION_ID RESOURCE_GROUP WORKSPACE_NAME
#                          EXPERIMENT_NAME CLUSTER_NAME STORAGE_ACCOUNT_NAME
#                          STORAGE_CONTAINER ENVIRONMENT_NAME
kedro azureml init <subscription-id> <resource-group-name> <workspace-name> <experiment-name> <compute-cluster-name> <storage-account-name> <storage-container-name> <environment-name>
Adjust the Data Catalog - the default one stores all data locally, whereas the plugin will automatically use Azure Blob Storage. Only input data is required to be read locally. Final
conf/base/catalog.ymlshould look like this:
companies:
  type: pandas.CSVDataSet
  filepath: data/01_raw/companies.csv
  layer: raw

reviews:
  type: pandas.CSVDataSet
  filepath: data/01_raw/reviews.csv
  layer: raw

shuttles:
  type: pandas.ExcelDataSet
  filepath: data/01_raw/shuttles.xlsx
  layer: raw
Prepare an Azure ML Environment for the project:
For the project’s code to run on Azure ML it needs to have an environment with the necessary dependencies.
- You have 2 options for executing your pipeline in Azure ML
Use code upload (default) - more suitable for Data Scientists’ experimentation and pipeline development
Use docker image flow (shown in the Quickstart video) - more suitable for MLOps processes with better experiment repeatability guarantees
Start by executing the following command:
kedro docker init
This command creates a several files, including Dockerfile and
.dockerignore. These can be adjusted to match the workflow for
your project.
Depending on whether you want to use code upload when submitting an experiment or not, you would need to add the code and any possible input data to the Docker image.
9.1. If using code upload (default)
Everything apart from the section “install project requirements”
can be removed from the Dockerfile. This plugin automatically creates empty .amlignore file (see the official docs)
which means that all of the files (including potentially sensitive ones!) will be uploaded to Azure ML. Modify this file if needed.
Ensure code_directory: "." is set in the azureml.yml config file (it’s set by default).
See example Dockerfile for code upload flow
ARG BASE_IMAGE=python:3.9
FROM $BASE_IMAGE

# install project requirements
COPY src/requirements.txt /tmp/requirements.txt
RUN pip install -r /tmp/requirements.txt && rm -f /tmp/requirements.txt
Build the image:
kedro docker build --docker-args "--build-arg=BASE_IMAGE=python:3.9" --image=<acr repo name>.azurecr.io/kedro-base-image:latest
Login to ACR and push the image:
az acr login --name <acr repo name>
docker push <acr repo name>.azurecr.io/kedro-base-image:latest
Register the Azure ML Environment:
az ml environment create --name <environment-name> --image <acr repo name>.azurecr.io/kedro-base-image:latest
Now you can re-use this environment and run the pipeline without the need to build the docker image again (unless you add some dependencies to your environment, obviously :-) ).
Warning
9.2. If using docker image flow (shown in the Quickstart video)
Note
Ensure that in the azureml.yml you have code_directory set to null, and docker.image is filled:
code_directory: ~
# rest of the azureml.yml file
docker:
   image: your-container-registry.azurecr.io/kedro-azureml:latest
Keep the sections in the Dockerfile and adjust the .dockerignore
file to include any other files to be added to the Docker image,
such as !data/01_raw for the raw data files.
Invoke docker build:
kedro docker build --docker-args "--build-arg=BASE_IMAGE=python:3.9" --image=<image tag from conf/base/azureml.yml>
Once finished, login to ACR:
az acr login --name <acr repo name>
and push the image:
docker push <image tag from conf/base/azureml.yml>
Run the pipeline on Azure ML Pipelines. Here, the Azure Subscription ID and Storage Account Key will be used:
kedro azureml run -s <azure-subscription-id>
You will most likely see the following prompt:
Environment variable AZURE_STORAGE_ACCOUNT_KEY not set, falling back to CLI prompt
Please provide Azure Storage Account Key for storage account <azure-storage-account>:
Input the storage account key and press [ENTER] (input will be hidden).
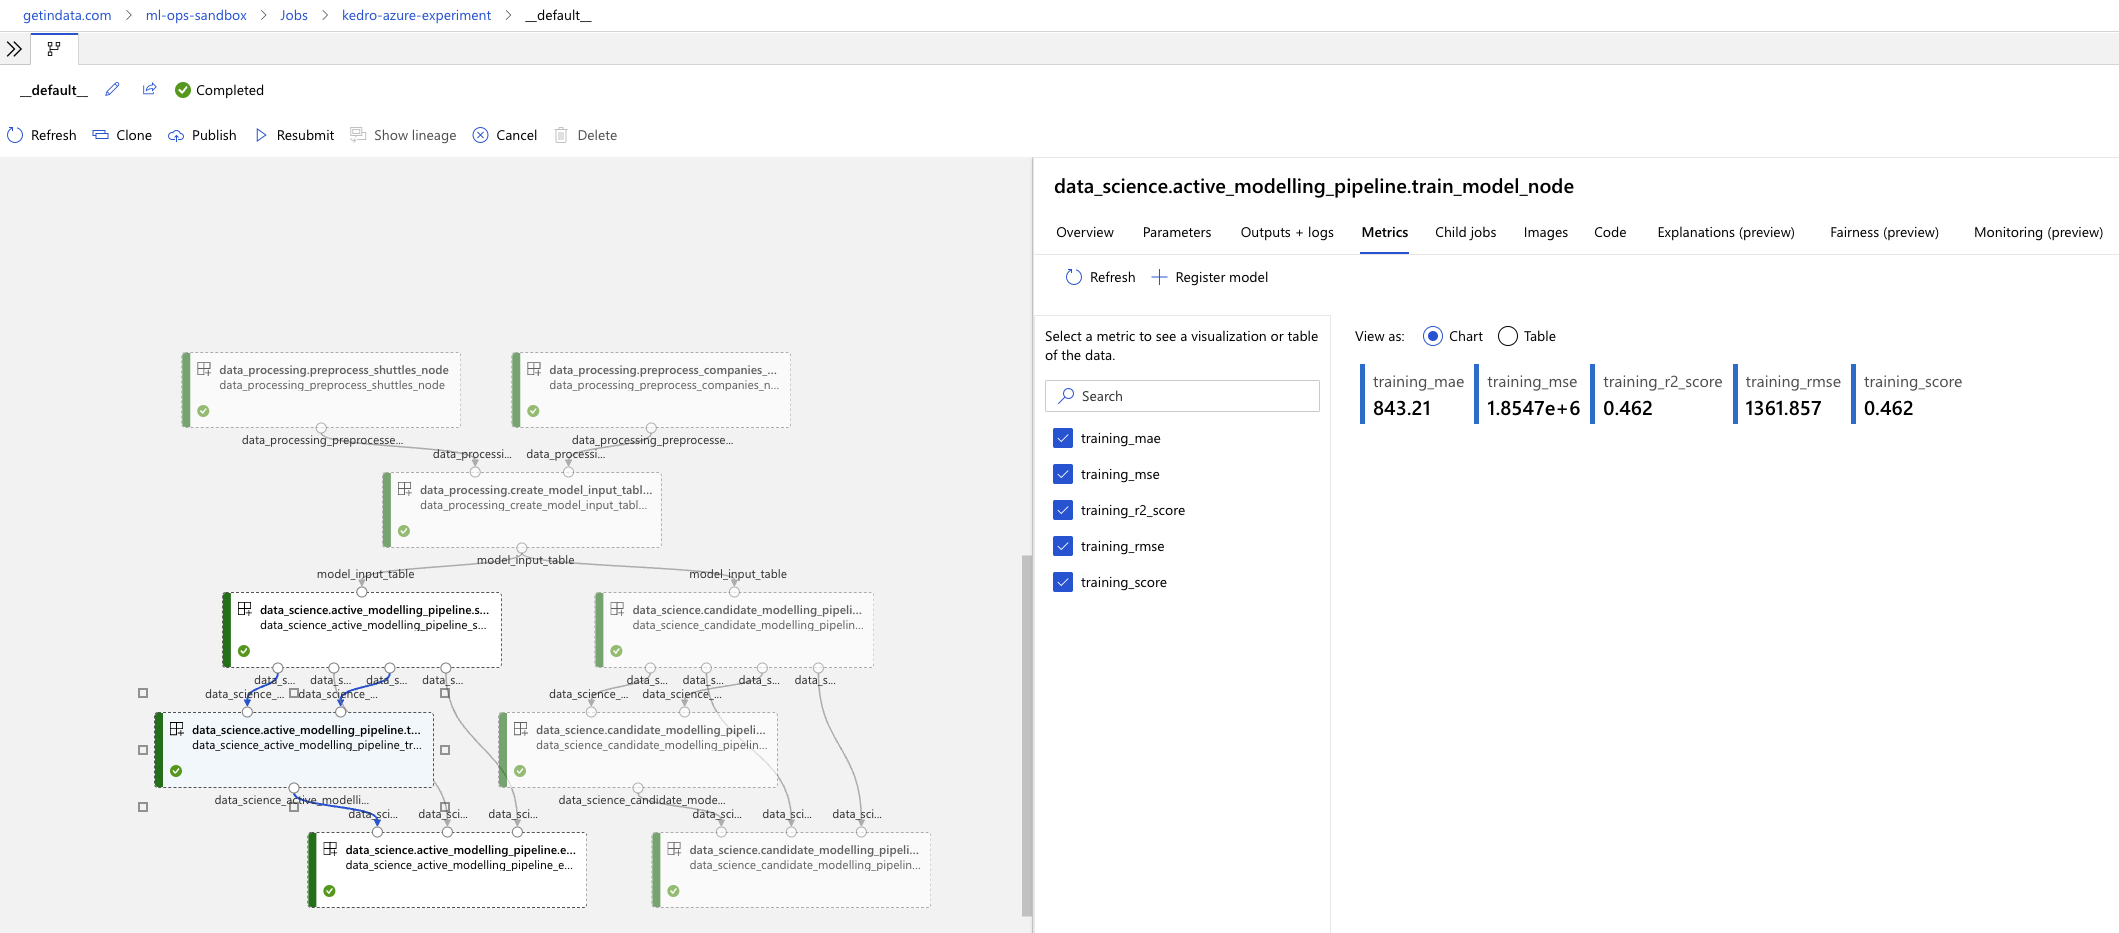
Plugin will verify the configuration (e.g. the existence of the compute cluster) and then it will create a Job in the Azure ML. The URL to view the job will be displayed in the console output.
(optional) You can also use
kedro azureml run -s <azure-subscription-id> --wait-for-completionto actively wait for the job to finish. Execution logs will be streamed to the console.
RunId: placid_pot_bdcyntnkvn
Web View: https://ml.azure.com/runs/placid_pot_bdcyntnkvn?wsid=/subscriptions/<redacted>/resourcegroups/<redacted>/workspaces/ml-ops-sandbox

Streaming logs/azureml/executionlogs.txt
========================================

[2022-07-22 11:45:38Z] Submitting 2 runs, first five are: 1ee5f43f:8cf2e387-e7ec-44cc-9615-2108891153f7,7d81aeeb:c8b837a9-1f79-4971-aae3-3191b29b42e8
[2022-07-22 11:47:02Z] Completing processing run id c8b837a9-1f79-4971-aae3-3191b29b42e8.
[2022-07-22 11:47:25Z] Completing processing run id 8cf2e387-e7ec-44cc-9615-2108891153f7.
[2022-07-22 11:47:26Z] Submitting 1 runs, first five are: 362b9632:7867ead0-b308-49df-95ca-efa26f8583cb
[2022-07-22 11:49:27Z] Completing processing run id 7867ead0-b308-49df-95ca-efa26f8583cb.
[2022-07-22 11:49:28Z] Submitting 2 runs, first five are: 03b2293e:e9e210e7-10ab-4010-91f6-4a40aabf3a30,4f9ccafb:3c00e735-cd3f-40c7-9c1d-fe53349ca8bc
[2022-07-22 11:50:50Z] Completing processing run id e9e210e7-10ab-4010-91f6-4a40aabf3a30.
[2022-07-22 11:50:51Z] Submitting 1 runs, first five are: 7a88df7a:c95c1488-5f55-48fa-80ce-971d5412f0fb
[2022-07-22 11:51:26Z] Completing processing run id 3c00e735-cd3f-40c7-9c1d-fe53349ca8bc.
[2022-07-22 11:51:26Z] Submitting 1 runs, first five are: a79effc8:0828c39a-6f02-43f5-acfd-33543f0d6c74
[2022-07-22 11:52:38Z] Completing processing run id c95c1488-5f55-48fa-80ce-971d5412f0fb.
[2022-07-22 11:52:39Z] Submitting 1 runs, first five are: 0a18d6d6:cb9c8f61-e129-4394-a795-ab70be74eb0f
[2022-07-22 11:53:03Z] Completing processing run id 0828c39a-6f02-43f5-acfd-33543f0d6c74.
[2022-07-22 11:53:04Z] Submitting 1 runs, first five are: 1af5c8de:2821dc44-3399-4a26-9cdf-1e8f5b7d6b62
[2022-07-22 11:53:28Z] Completing processing run id cb9c8f61-e129-4394-a795-ab70be74eb0f.
[2022-07-22 11:53:51Z] Completing processing run id 2821dc44-3399-4a26-9cdf-1e8f5b7d6b62.

Execution Summary
=================
RunId: placid_pot_bdcyntnkvn
MLflow integration
The plugin is compatible with mlflow (but not yet with
kedro-mlflow). You can use native mlflow logging capabilities
provided by Azure ML. See the guide here:
https://docs.microsoft.com/en-us/azure/machine-learning/how-to-use-mlflow-cli-runs?tabs=azuremlsdk.
There is no additional configuration for MLflow required in order to use it with Azure ML pipelines. All the settings are provided automatically by the Azure ML service.
Using a different compute cluster for specific nodes
For certain nodes it can make sense to run them on a different
compute clusters (e.g. High Memory or GPU). This can be achieved
using Node tags
and adding additional compute targets in your azureml.yml.
After creating an additional compute cluster in your AzureML workspace,
in this case the additional cluster is called cpu-cluster-8,
we can add it in our azureml.yml under an alias (in this case chunky).
compute:
  __default__:
    cluster_name: "cpu-cluster"
  chunky:
    cluster_name: "cpu-cluster-8"
Now we are able to reference this compute target in our kedro pipelines using kedro node tags:
[
    node(
        func=preprocess_companies,
        inputs="companies",
        outputs="preprocessed_companies",
        name="preprocess_companies_node",
        tags=["chunky"]
    ),
    node(
        func=preprocess_shuttles,
        inputs="shuttles",
        outputs="preprocessed_shuttles",
        name="preprocess_shuttles_node",
    ),
    node(
        func=create_model_input_table,
        inputs=["preprocessed_shuttles", "preprocessed_companies", "reviews"],
        outputs="model_input_table",
        name="create_model_input_table_node",
        tags=["chunky"]
    ),
],
When running our project, preprocess_companies and create_model_input_table
will be run on cpu-cluster-8 while all other nodes are run on the default cpu-cluster.
Distributed training
The plugins supports distributed training via native Azure ML distributed orchestration, which includes:
MPI - https://learn.microsoft.com/en-us/azure/machine-learning/how-to-train-distributed-gpu#mpi
PyTorch - https://learn.microsoft.com/en-us/azure/machine-learning/how-to-train-distributed-gpu#pytorch
TensorFlow - https://learn.microsoft.com/en-us/azure/machine-learning/how-to-train-distributed-gpu#tensorflow
If one of your Kedro’s pipeline nodes requires distributed training (e.g. you train a neural network with PyTorch), you can mark the node with distributed_job decorator from kedro_azureml.distributed.decorators and use native Kedro parameters to specify the number of nodes you want to spawn for the job.
An example for PyTorch looks like this:
#                    | use appropriate framework
#                   \|/                      \/ specify the number of distributed nodes to spawn for the job
@distributed_job(Framework.PyTorch, num_nodes="params:num_nodes")
def train_model_pytorch(
    X_train: pd.DataFrame, y_train: pd.Series, num_nodes: int, max_epochs: int
):
    # rest of the code
    pass
In the pipeline you would use this node like that:
node(
    func=train_model_pytorch,
    inputs=["X_train", "y_train", "params:num_nodes", "params:max_epochs"],
    outputs="regressor",
    name="train_model_node",
),
and that’s it!
The params: you use support namespacing as well as overriding at runtime, e.g. when launching the Azure ML job:
kedro azureml run -s <subscription id> --params '{"data_science": {"active_modelling_pipeline": {"num_nodes": 4}}}'
The distributed_job decorator also supports “hard-coded” values for number of nodes:
@distributed_job(Framework.PyTorch, num_nodes=2) # no need to use Kedro params here
def train_model_pytorch(
    X_train: pd.DataFrame, y_train: pd.Series, num_nodes: int, max_epochs: int
):
    # rest of the code
    pass
We have tested the implementation heavily with PyTorch (+PyTorch Lightning) and GPUs. If you encounter any problems, drop us an issue on GitHub!
Run customization
In case you need to customize pipeline run context, modifying configuration files is not always the most convinient option. Therefore, kedro azureml run command provides a few additional options you may find useful:
--subscription_idoverrides Azure Subscription ID,--azureml_environmentoverrides the configured Azure ML Environment,--imagemodifies the Docker image used during the execution,--pipelineallows to select a pipeline to run (by default, the__default__pipeline is started),--paramstakes a JSON string with parameters override (JSONed version ofconf/*/parameters.yml, not the Kedro’sparams:syntax),--env-var KEY=VALUEsets the OS environment variable injected to the steps during runtime (can be used multiple times).